So, it’s been awhile. Life has been busy around here! {While I can’t promise anything, I’m hoping we are back to a more regular posting schedule in the near future!!!}
Then it was Christmas. I hope everyone has been enjoying the holidays. We’ve had a great few days, with my parents visiting
and just hanging out. This was one of the few Christmas ever that I was not at my parent’s house on Christmas Eve and Christmas morning. Kind of crazy and fun to be spending it in our own home! And we’re expecting some of my husband’s family for New Years, so that will be fun, too.
Like I’ve written about 3 different times within the last month or so, we put up a gallery wall in our upstairs hallway. I wanted to share a quick little tutorial on how I was able to figure out the placement of all the frames in a fairly quick and easy way.
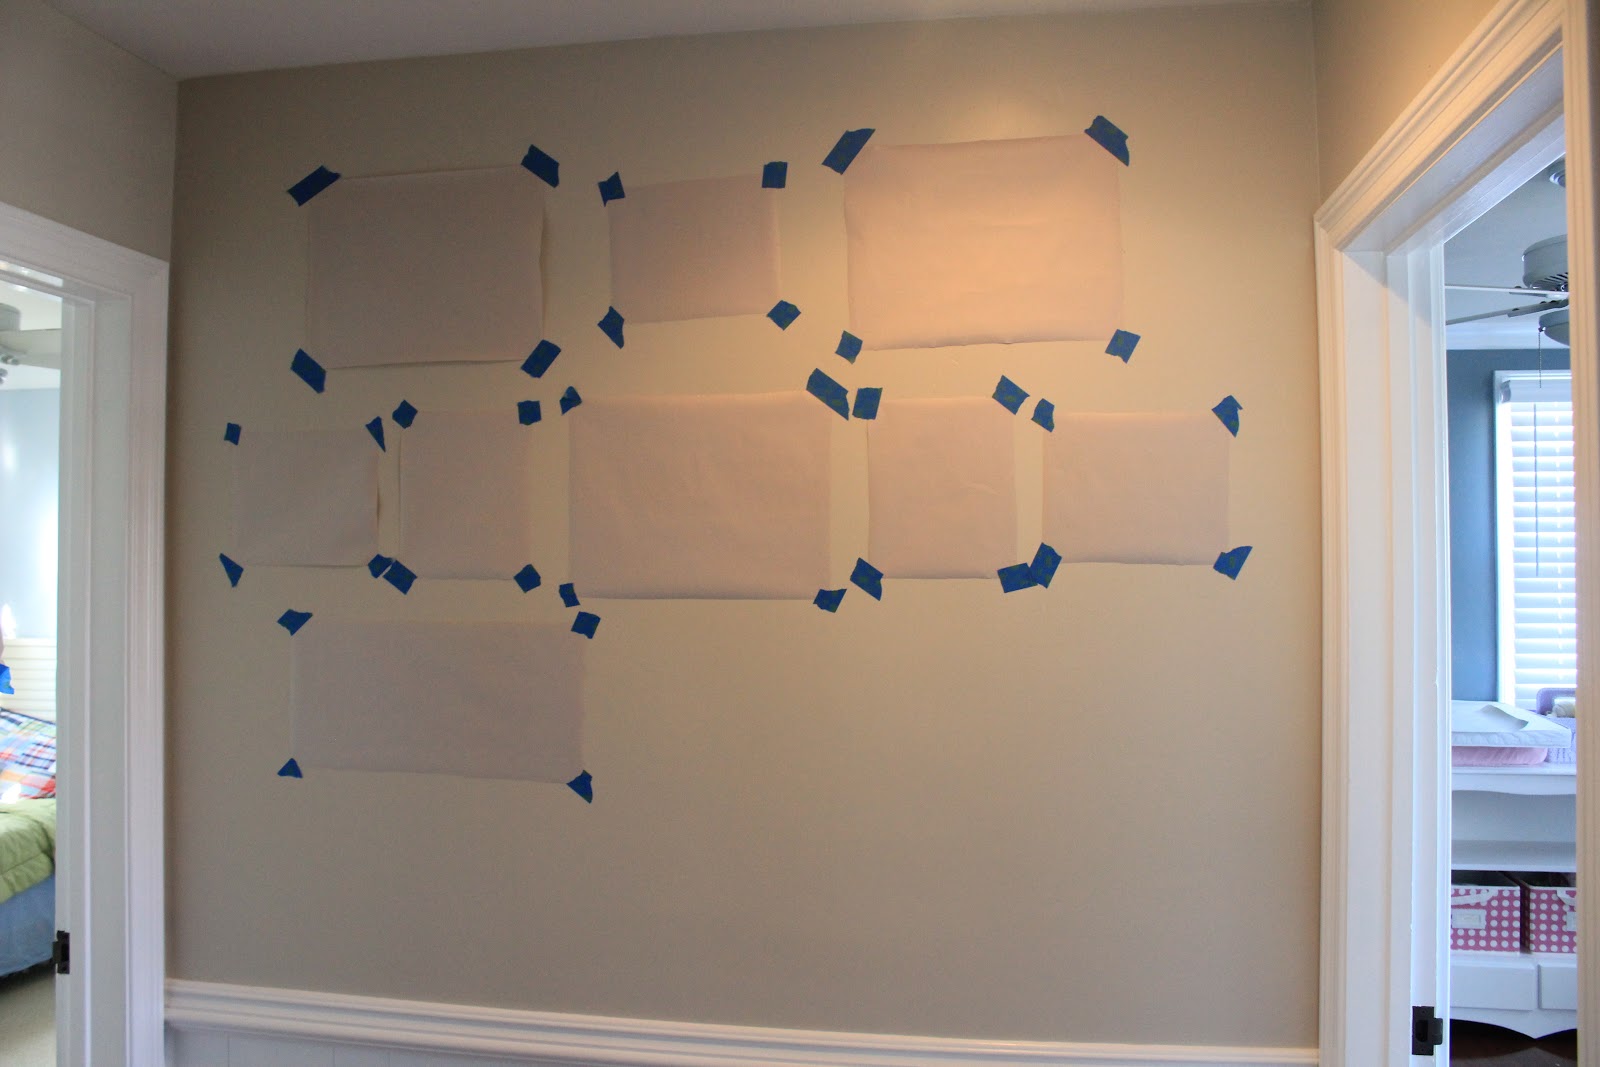
Step 1: I had some butcher paper on hand, and I traced each frame onto the paper and then cut them out. I had an idea of what size frames I wanted for this project, but not every photo was planned out ahead of time. I wanted to get the sizes I knew I wanted and then fill in with what looked the best.
Step 2: I started with some of the larger frames and used blue painters tape {so I didn’t undo any of the hard work I had done while painting} and just started putting the cutouts up on the wall. I wasn’t too concerned yet with exact spacing or leveling. I was just trying to get a feel for the overall layout. At first, I was hoping to do more of an
asymmetrical layout, fitting not just frames but maybe a few photo
canvases and art up there along with the photos.
asymmetrical layout, fitting not just frames but maybe a few photo
canvases and art up there along with the photos.
First attempt…

I decided I didn’t love how the first layout was looking.
*Just a few little suggestions…I’ve written this before, but I try to go with an overall uniformity or likeness when doing a gallery wall. For a more contemporary look, go with all the same frames or at least the same color frame. Mix it up by putting different art and photos into them. For a more vintage, collected feel, mixing up the frames works well, but still try to keep them similar. Stick with the same frame tones, either lighter frames {white, silver, lighter wood tones} or darker wood tones, bronze and gold frames for a more traditional look.*
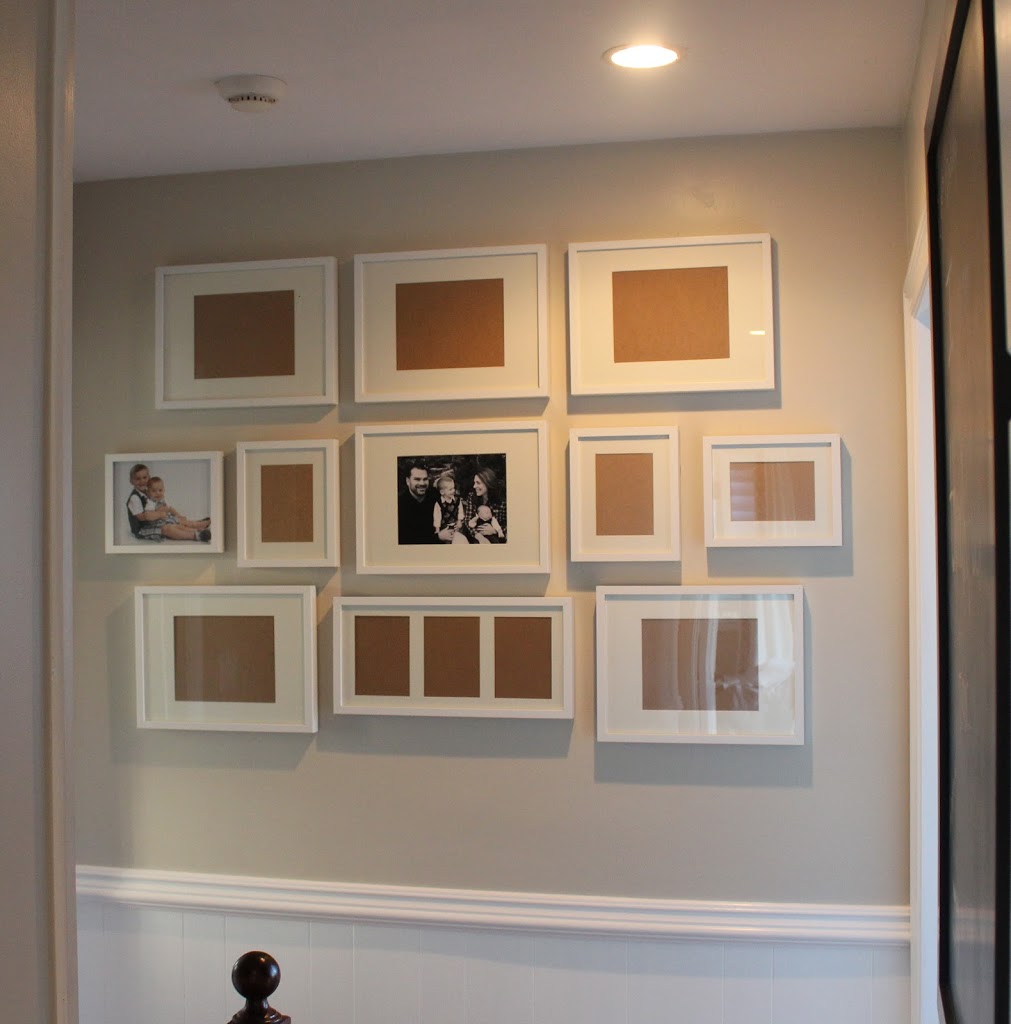
I had chosen my favorite Ribba white frame from Ikea, so I knew the frames were all going to be the same style, just different sizes. I started moving things around and it worked out that I was going to stick with all the same frames for family photos. At this point I was still open to try for an asymmetrical layout.
But as I kept re-working it, I feel into a symmetrical layout that included 5 of the larger frames, 1 smaller, longer rectangle frame {that has 3 photo slots to it-I have the perfect “series” of photos of my little guy hoarding dump trucks at the pumpkin patch this year for that one!} and 4 smaller frames, 2 horizontal and 2 vertical.

The final layout.

Since I wouldn’t be the one hanging them, I tried to get them as evenly spaced and straight as I could by just eyeballing it. I figured the picture hanging guys could figure out the exact spacing and leveling. But if I were to hang these myself, I would start with the center frame and move outwards, measuring and leveling as I went along. I left a bit of room under all the photos for the little hands that like to grace {aka drag} the walls!
I may have mentioned this back in the post on the picture hanger guys coming, but they added their own small picture hangers on the back of each frame. The Ikea frames come with wire and movable hangers that could add a bit of a challenge when hanging a gallery wall because they would all be slightly different unless you measured each wire, etc. to be exactly the same.
And after everything was hung...

It still looks like this, but we just got our family photos taken and I had some photos already marked for these frames, so hopefully I’ll get around to ordering some prints and popping them into these frames to share with you very soon!


Leave a Reply